<?xml version="1.0" encoding="utf-8"?><feed xmlns="http://www.w3.org/2005/Atom" ><generator uri="https://jekyllrb.com/" version="3.10.0">Jekyll</generator><link href="/feed.xml" rel="self" type="application/atom+xml" /><link href="/" rel="alternate" type="text/html" /><updated>2026-06-24T22:04:55+00:00</updated><id>/feed.xml</id><title type="html">Jake Stothard</title><subtitle>Software engineering explorations in sporadic directions.</subtitle><entry><title type="html">Generating a kids app using AI</title><link href="/ai/2026/06/19/generating-a-kids-app-with-ai.html" rel="alternate" type="text/html" title="Generating a kids app using AI" /><published>2026-06-19T22:03:06+00:00</published><updated>2026-06-19T22:03:06+00:00</updated><id>/ai/2026/06/19/generating-a-kids-app-with-ai</id><content type="html" xml:base="/ai/2026/06/19/generating-a-kids-app-with-ai.html"><![CDATA[<p>My daughter just turned three years old so she’s allowed some screen time. This
could also be an opportunity to practice her fine motor skills. The first
couple apps I checked out felt like a ripoff though. They were trying to get me
into an annual subscription just for tracing some pictures.</p>

<p>The promise of AI should be that I can just ask an agent to make this app and
let my daugter play. So let’s try it.</p>

<h2 id="the-final-product">The Final Product</h2>

<p>Let’s skip ahead. What did I actually generate in the end?</p>

<p>Before we talk about the phone app let’s talk about the content. How do we get
images for the kid to trace?</p>

<h3 id="step-1-generate-the-list-of-images-to-generate">Step 1: Generate the list of images to generate</h3>

<p>This is pretty straight forward. I just asked Gemini to pick 25 topics and 4
subjects for each topic.</p>

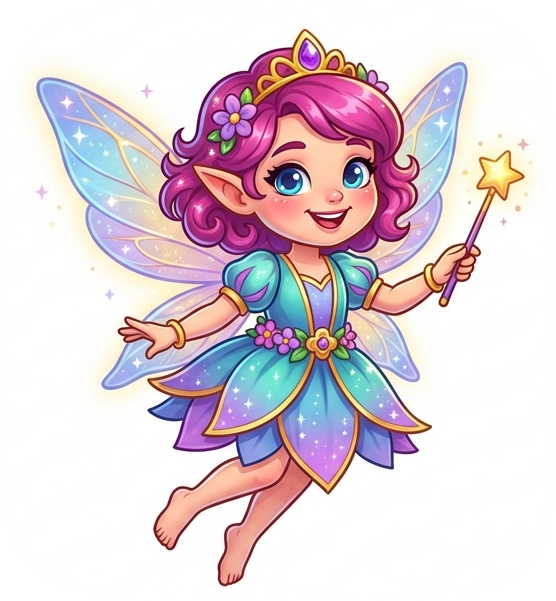
<h3 id="step-2-generate-the-images">Step 2: Generate the images</h3>

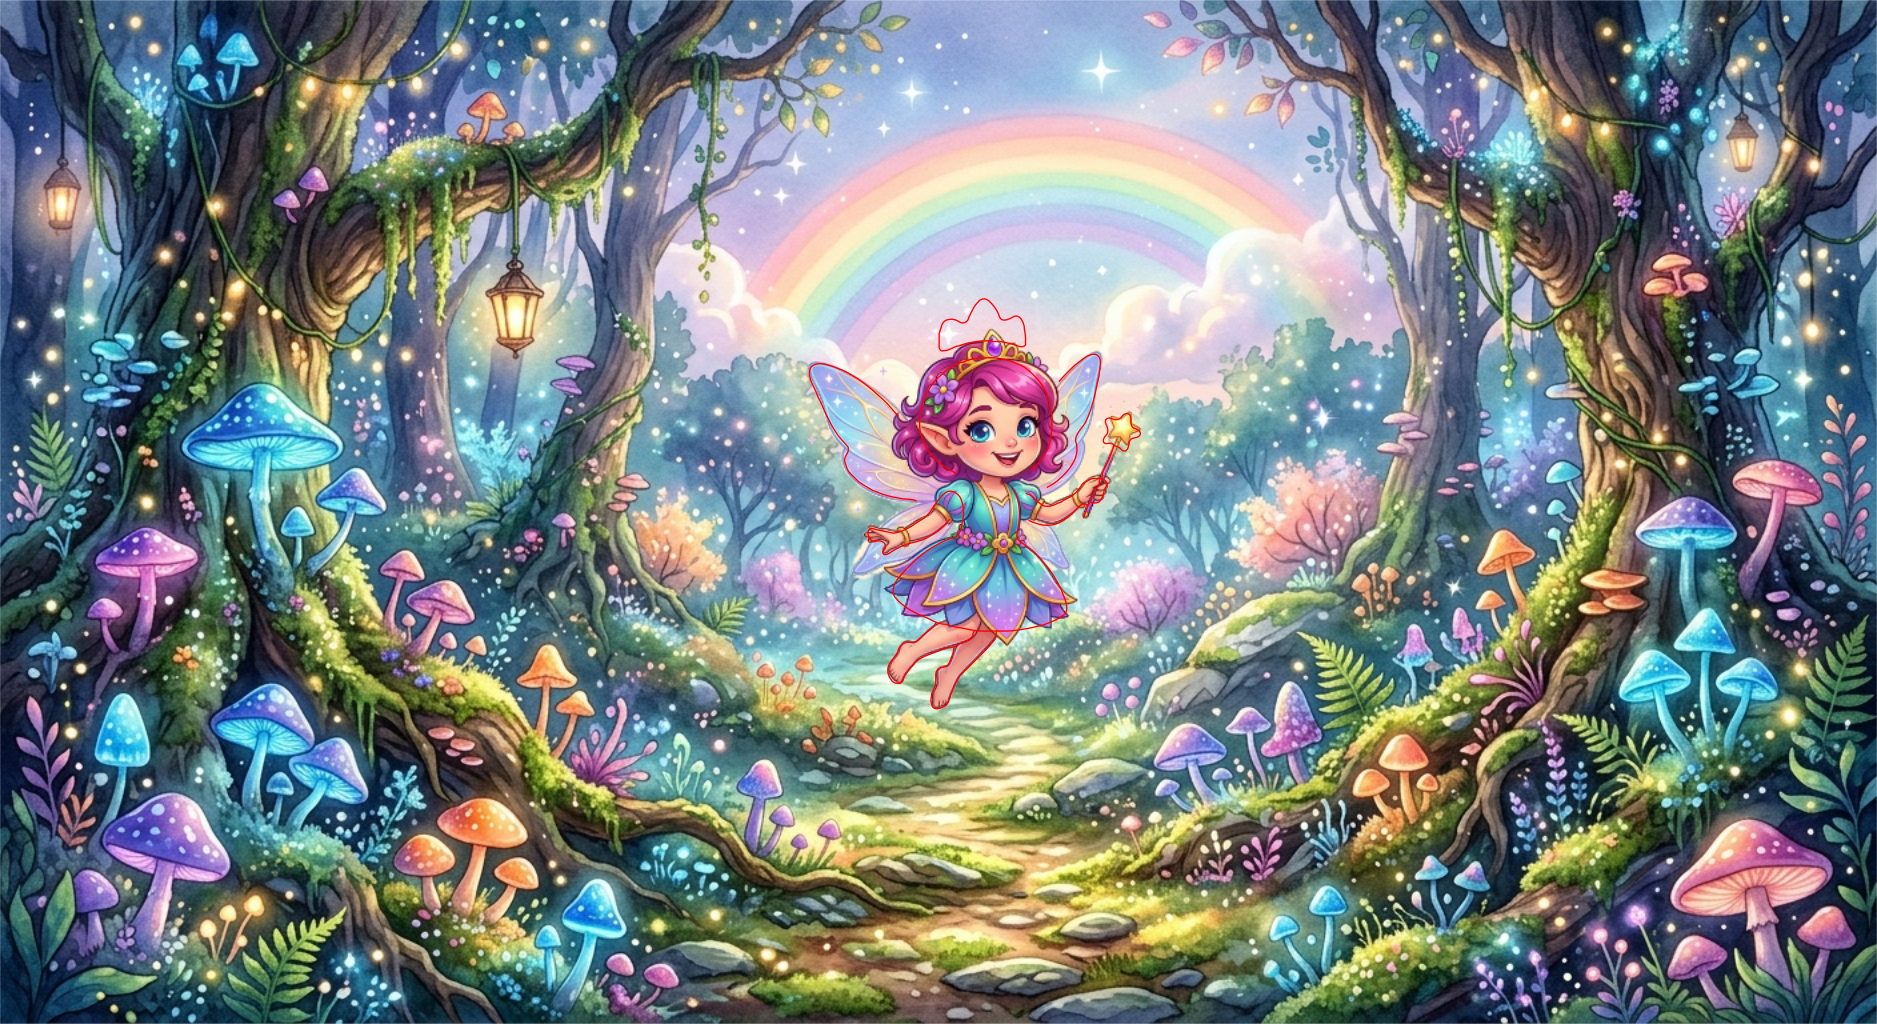
<p><img src="/assets/images/fairy.png" alt="Fairy" /></p>

<p>Next was generating each of the images. Using python I just looped over the
list generated above and had it just call Gemini using Google’s genai library
for each subject in the list. Here’s what was in that loop:</p>

<div class="language-python highlighter-rouge"><div class="highlight"><pre class="highlight"><code>
<span class="n">prompt</span> <span class="o">=</span> <span class="sa">f</span><span class="s">"""
Generate a cartoon image of a </span><span class="si">{</span><span class="n">subject</span><span class="si">}</span><span class="s">. Use the bright, vibrant, cute style that you might expect from a phone app icon. Keep it accurate. Only include the </span><span class="si">{</span><span class="n">subject</span><span class="si">}</span><span class="s">; no other objects or effects. Use a plain white background.
"""</span>

<span class="n">interaction</span> <span class="o">=</span> <span class="n">client</span><span class="p">.</span><span class="n">interactions</span><span class="p">.</span><span class="n">create</span><span class="p">(</span>
  <span class="n">model</span><span class="o">=</span><span class="s">'gemini-3.1-flash-image'</span><span class="p">,</span>
  <span class="nb">input</span><span class="o">=</span><span class="n">prompt</span><span class="p">,</span>
<span class="p">)</span>

<span class="n">full_path</span> <span class="o">=</span> <span class="n">dir_path</span> <span class="o">/</span> <span class="n">Path</span><span class="p">(</span><span class="sa">f</span><span class="s">'</span><span class="si">{</span><span class="n">subject</span><span class="si">}</span><span class="s">.png'</span><span class="p">)</span>
<span class="n">full_path</span><span class="p">.</span><span class="n">write_bytes</span><span class="p">(</span><span class="n">base64</span><span class="p">.</span><span class="n">b64decode</span><span class="p">(</span><span class="n">interaction</span><span class="p">.</span><span class="n">output_image</span><span class="p">.</span><span class="n">data</span><span class="p">))</span>

</code></pre></div></div>

<p>The prompts throughout this post will reflect a lot of the trial and error that
comes with trying to get genai to do the right thing. One quirk I found here is
it’s a lot better to ask for a “white background” than “no background”.
Occasionally “no background” leads to the checkerboard pattern which you often
see representing transparency online. But it’s not transparent, it’s actually
Gemini mimicing the pattern.</p>

<h3 id="step-3-pick-the-backgrounds">Step 3: Pick the backgrounds</h3>

<p>Each image is going to have to be placed on a background, so the next step is
choosing what those backgrounds will be. I do this independently of actually
generating the background images so I can quickly take a look at what it’s
coming up with. Generating images is cheap, but not free.</p>

<p>You may be wondering why the backgrounds are generated separately. Well, in
some other processing steps I’ll want to only operate on the foreground and
it’s easier to combine a forground image with a background image than it is to
try to separate the foreground from an image which generated both at the same
time.</p>

<p>Again I’m calling Gemini from python in a loop, but this time I want to output
JSON instead of an image.</p>

<div class="language-python highlighter-rouge"><div class="highlight"><pre class="highlight"><code>
        <span class="n">prompt</span> <span class="o">=</span> <span class="sa">f</span><span class="s">"""There's a cartoon image of a </span><span class="si">{</span><span class="n">subject</span><span class="si">}</span><span class="s"> which I need to put on top of a background for a kid's app. What is an appropriate background to use for this?

IMPORTANT: Respond using JSON! The response to this prompt will be used non-interactively. Format as follows:

{{"background": "Your background choice"}}
        """</span>
<span class="n">response</span> <span class="o">=</span> <span class="n">client</span><span class="p">.</span><span class="n">models</span><span class="p">.</span><span class="n">generate_content</span><span class="p">(</span>
    <span class="n">model</span><span class="o">=</span><span class="s">'gemini-3.5-flash'</span><span class="p">,</span>
    <span class="n">contents</span><span class="o">=</span><span class="n">prompt</span><span class="p">,</span>
    <span class="n">config</span><span class="o">=</span><span class="n">types</span><span class="p">.</span><span class="n">GenerateContentConfig</span><span class="p">(</span>
        <span class="n">response_mime_type</span><span class="o">=</span><span class="s">'application/json'</span><span class="p">,</span>
        <span class="n">response_schema</span><span class="o">=</span><span class="n">Background</span><span class="p">,</span>
    <span class="p">),</span>
<span class="p">)</span>

<span class="n">background</span> <span class="o">=</span> <span class="n">Background</span><span class="p">.</span><span class="n">model_validate_json</span><span class="p">(</span><span class="n">response</span><span class="p">.</span><span class="n">text</span><span class="p">)</span>
<span class="n">background_choice</span><span class="p">[</span><span class="n">topic</span><span class="p">].</span><span class="n">append</span><span class="p">((</span><span class="n">subject</span><span class="p">,</span> <span class="n">background</span><span class="p">.</span><span class="n">background</span><span class="p">))</span>

</code></pre></div></div>

<p>As any AI expert will tell you, screaming at models that they should output
JSON is a critical part of the job.</p>

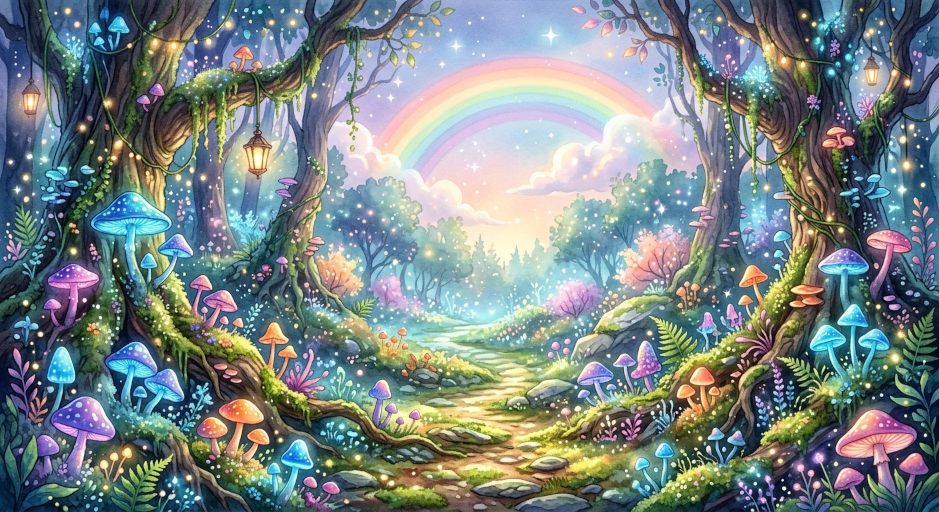
<h3 id="step-4-generate-the-background-images">Step 4: Generate the background images</h3>

<p><img src="/assets/images/fairy-background.png" alt="Fairy Background" /></p>

<p>This is actually exactly as generating the background images. I actually didn’t
ask Gemini to put the foreground image in place, but it might have worked.</p>

<div class="language-python highlighter-rouge"><div class="highlight"><pre class="highlight"><code>
<span class="n">prompt</span> <span class="o">=</span> <span class="sa">f</span><span class="s">'Generate </span><span class="si">{</span><span class="n">background</span><span class="p">.</span><span class="n">lower</span><span class="p">()</span><span class="si">}</span><span class="s">. Leave space in the middle of the image for me to add the subject in later.'</span>
<span class="n">interaction</span> <span class="o">=</span> <span class="n">client</span><span class="p">.</span><span class="n">interactions</span><span class="p">.</span><span class="n">create</span><span class="p">(</span>
    <span class="n">model</span><span class="o">=</span><span class="s">'gemini-3.1-flash-image'</span><span class="p">,</span>
    <span class="nb">input</span><span class="o">=</span><span class="n">prompt</span><span class="p">,</span>
<span class="p">)</span>

</code></pre></div></div>

<p>I didn’t include the foreground image in the prompt as I was concerned it would
influence the background image in unexpected ways. However this also led to
some surprises. Sometimes the background would include elements that made the
foreground not make as much sense. For example the foreground image being a
drumset and the background being a rockband stage full of instruments…
including another drumset. Other times the generated background made it clear
that the background description had lost crucial detail. For example some of
them were realisitc instead of being cartoons! If I were to revisit this
pipeline I would probably either merge the steps of choosing and generating the
backgrounds or include the foreground alongside the chosen background
description.</p>

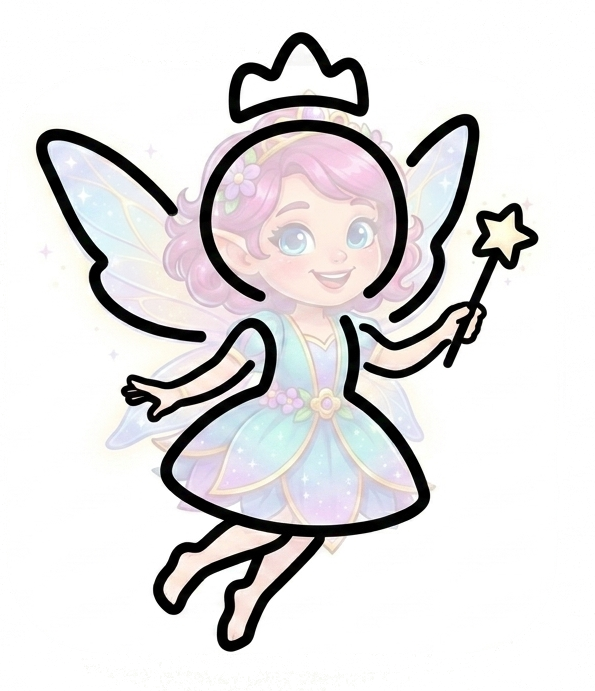
<h3 id="step-5-highlighting-the-important-parts-of-the-image">Step 5: Highlighting the “important” parts of the image</h3>

<p><img src="/assets/images/fairy-simplified.png" alt="Fairy Simplified" /></p>

<p>I’m a patient adult but even I don’t have the patience to trace every feather of a
peacock.</p>

<p>But how can I define what the “important” parts of an image are. It’s not just
the biggest. The peacock’s feathers are bigger than the beak, but it makes more
sense for the child to practice tracing the beak.</p>

<p>This lack of clear success criteria led me to just see what would happen if I
asked Gemini to choose the important parts. After a lot of trial and error I
managed to create a prompt which led to decent results. The trick was to
require the bold lines be overlayed onto the original image. Without this,
Gemini had a strong tendancy to just generate a different image.</p>

<div class="language-python highlighter-rouge"><div class="highlight"><pre class="highlight"><code>
<span class="n">TEXT_PROMPT</span> <span class="o">=</span> <span class="sa">f</span><span class="s">"""
Create a version of this image with BOLD well-defined lines a kid should trace in a tracing app. Only include the very important lines in order to get a basic outline of the form. The toddler will only have patience for at most 10 lines. Use simple curves for each line, ignoring small bumps and details.

IMPORTANT: The outline MUST overlay onto a low opacity copy of the original image. Keep the original image present.

DO NOT add any other elements to the image. Just increase the thickness of lines to be traced.
"""</span>

<span class="k">def</span> <span class="nf">process_image</span><span class="p">(</span><span class="n">input_path</span><span class="p">,</span> <span class="n">rel_path</span><span class="p">):</span>
    <span class="n">subject</span> <span class="o">=</span> <span class="n">rel_path</span><span class="p">.</span><span class="n">stem</span>
    <span class="n">output_name</span> <span class="o">=</span> <span class="sa">f</span><span class="s">"</span><span class="si">{</span><span class="n">rel_path</span><span class="p">.</span><span class="n">stem</span><span class="si">}</span><span class="s">-simplified.png"</span>
    <span class="n">output_path</span> <span class="o">=</span> <span class="n">generated_bold</span> <span class="o">/</span> <span class="n">rel_path</span><span class="p">.</span><span class="n">parent</span> <span class="o">/</span> <span class="n">output_name</span>
    <span class="n">output_path</span><span class="p">.</span><span class="n">parent</span><span class="p">.</span><span class="n">mkdir</span><span class="p">(</span><span class="n">parents</span><span class="o">=</span><span class="bp">True</span><span class="p">,</span> <span class="n">exist_ok</span><span class="o">=</span><span class="bp">True</span><span class="p">)</span>
    <span class="k">print</span><span class="p">(</span><span class="sa">f</span><span class="s">"Processing </span><span class="si">{</span><span class="n">input_path</span><span class="si">}</span><span class="s"> (subject=</span><span class="si">{</span><span class="n">subject</span><span class="si">}</span><span class="s">) -&gt; </span><span class="si">{</span><span class="n">output_path</span><span class="si">}</span><span class="s">"</span><span class="p">)</span>

    <span class="n">image</span> <span class="o">=</span> <span class="n">Image</span><span class="p">.</span><span class="nb">open</span><span class="p">(</span><span class="n">input_path</span><span class="p">)</span>
    <span class="n">response</span> <span class="o">=</span> <span class="n">client</span><span class="p">.</span><span class="n">models</span><span class="p">.</span><span class="n">generate_content</span><span class="p">(</span>
        <span class="n">model</span><span class="o">=</span><span class="s">'gemini-3.1-flash-image'</span><span class="p">,</span>
        <span class="n">contents</span><span class="o">=</span><span class="p">[</span>
            <span class="n">TEXT_PROMPT</span><span class="p">,</span>
            <span class="n">image</span><span class="p">,</span>
        <span class="p">],</span>
        <span class="n">config</span><span class="o">=</span><span class="n">types</span><span class="p">.</span><span class="n">GenerateContentConfig</span><span class="p">(</span>
            <span class="n">response_modalities</span><span class="o">=</span><span class="p">[</span><span class="s">'TEXT'</span><span class="p">,</span> <span class="s">'IMAGE'</span><span class="p">]</span>
        <span class="p">)</span>
    <span class="p">)</span>

    <span class="k">for</span> <span class="n">part</span> <span class="ow">in</span> <span class="n">response</span><span class="p">.</span><span class="n">parts</span><span class="p">:</span>
        <span class="k">if</span> <span class="n">part</span><span class="p">.</span><span class="n">text</span> <span class="ow">is</span> <span class="ow">not</span> <span class="bp">None</span><span class="p">:</span>
            <span class="k">print</span><span class="p">(</span><span class="sa">f</span><span class="s">'From model output: </span><span class="si">{</span><span class="n">part</span><span class="p">.</span><span class="n">text</span><span class="si">}</span><span class="s">'</span><span class="p">)</span>
        <span class="k">elif</span> <span class="n">part</span><span class="p">.</span><span class="n">inline_data</span> <span class="ow">is</span> <span class="ow">not</span> <span class="bp">None</span><span class="p">:</span>
            <span class="k">print</span><span class="p">(</span><span class="s">'Has inline data!'</span><span class="p">)</span>
            <span class="n">image</span> <span class="o">=</span> <span class="n">part</span><span class="p">.</span><span class="n">as_image</span><span class="p">()</span>
            <span class="n">image</span><span class="p">.</span><span class="n">save</span><span class="p">(</span><span class="n">output_path</span><span class="p">)</span>

</code></pre></div></div>

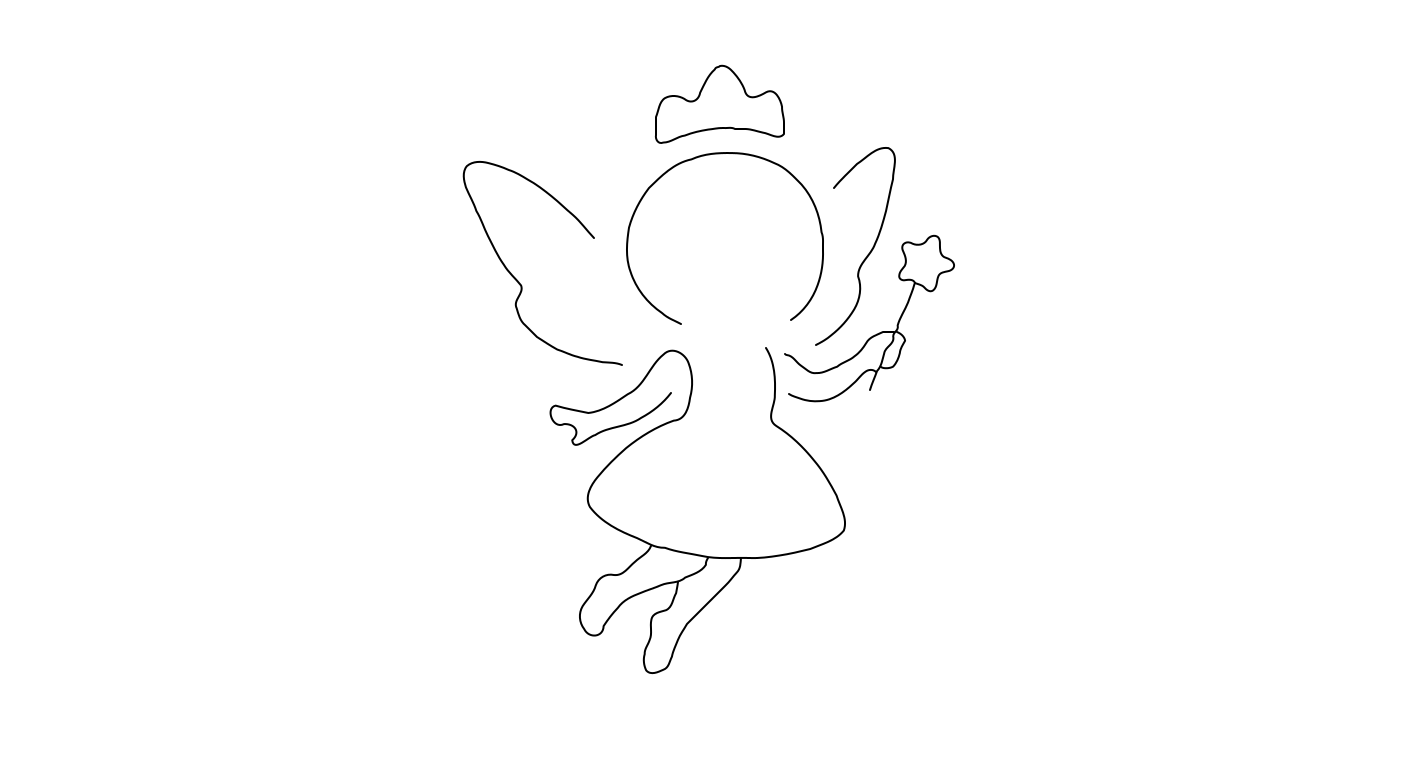
<h3 id="step-6-trace-the-image">Step 6: Trace the image</h3>

<p><img src="/assets/images/fairy-traced.svg" alt="Fairy Traced" /></p>

<p>So far all the images are pngs, but I really need a vector file so that the app
knows where the kid needs to trace. Converting a png to an svg is not trivial,
and I’ll talk about the failed paths later. This is perhaps the most
interesting part of the project.</p>

<p>First we import the image and convert it to black and white using OpenCV. Each
image will be generated with multiple thresholds for the greyscale to black and
white conversion. Unfortunately there was not one divider which was universally
best across images.</p>

<p>This step generally had the property that the semi-transparent overlay
disappeared. There are some images which are currently excluded from the app
because they didn’t auto-trace well. The plan is to try converting them to HSV
and then dropping things with a low saturation. I’ll have to experiment though.</p>

<div class="language-python highlighter-rouge"><div class="highlight"><pre class="highlight"><code>
<span class="c1"># Read the image using cv2
</span><span class="n">img</span> <span class="o">=</span> <span class="n">cv2</span><span class="p">.</span><span class="n">imread</span><span class="p">(</span><span class="nb">str</span><span class="p">(</span><span class="n">input_path</span><span class="p">))</span>
<span class="k">if</span> <span class="n">img</span> <span class="ow">is</span> <span class="bp">None</span><span class="p">:</span>
    <span class="k">print</span><span class="p">(</span><span class="sa">f</span><span class="s">"Error: Could not read image '</span><span class="si">{</span><span class="n">input_path</span><span class="si">}</span><span class="s">'"</span><span class="p">,</span> <span class="nb">file</span><span class="o">=</span><span class="n">sys</span><span class="p">.</span><span class="n">stderr</span><span class="p">)</span>
    <span class="n">sys</span><span class="p">.</span><span class="nb">exit</span><span class="p">(</span><span class="mi">1</span><span class="p">)</span>

<span class="c1"># Convert to grayscale
</span><span class="n">gray</span> <span class="o">=</span> <span class="n">cv2</span><span class="p">.</span><span class="n">cvtColor</span><span class="p">(</span><span class="n">img</span><span class="p">,</span> <span class="n">cv2</span><span class="p">.</span><span class="n">COLOR_BGR2GRAY</span><span class="p">)</span>

<span class="c1"># Apply Gaussian blur
</span><span class="n">blurred</span> <span class="o">=</span> <span class="n">cv2</span><span class="p">.</span><span class="n">GaussianBlur</span><span class="p">(</span><span class="n">gray</span><span class="p">,</span> <span class="p">(</span><span class="mi">5</span><span class="p">,</span> <span class="mi">5</span><span class="p">),</span> <span class="mi">0</span><span class="p">)</span>

<span class="n">height</span><span class="p">,</span> <span class="n">width</span><span class="p">,</span> <span class="n">_</span> <span class="o">=</span> <span class="n">img</span><span class="p">.</span><span class="n">shape</span>

<span class="k">for</span> <span class="n">thresh</span> <span class="ow">in</span> <span class="n">thresholds</span><span class="p">:</span>
    <span class="n">output_name</span> <span class="o">=</span> <span class="sa">f</span><span class="s">"</span><span class="si">{</span><span class="n">rel_path</span><span class="p">.</span><span class="n">stem</span><span class="si">}</span><span class="s">-</span><span class="si">{</span><span class="n">thresh</span><span class="si">}</span><span class="s">.svg"</span>
    <span class="n">output_path</span> <span class="o">=</span> <span class="n">generated_autotrace</span> <span class="o">/</span> <span class="n">rel_path</span><span class="p">.</span><span class="n">parent</span> <span class="o">/</span> <span class="n">output_name</span>
    <span class="n">output_path</span><span class="p">.</span><span class="n">parent</span><span class="p">.</span><span class="n">mkdir</span><span class="p">(</span><span class="n">parents</span><span class="o">=</span><span class="bp">True</span><span class="p">,</span> <span class="n">exist_ok</span><span class="o">=</span><span class="bp">True</span><span class="p">)</span>

    <span class="k">print</span><span class="p">(</span><span class="sa">f</span><span class="s">"Processing: </span><span class="si">{</span><span class="n">input_path</span><span class="si">}</span><span class="s"> (threshold=</span><span class="si">{</span><span class="n">thresh</span><span class="si">}</span><span class="s">) -&gt; </span><span class="si">{</span><span class="n">output_path</span><span class="si">}</span><span class="s">"</span><span class="p">)</span>

    <span class="c1"># Convert to black and white
</span>    <span class="n">bw</span> <span class="o">=</span> <span class="n">cv2</span><span class="p">.</span><span class="n">threshold</span><span class="p">(</span><span class="n">blurred</span><span class="p">,</span> <span class="n">thresh</span><span class="p">,</span> <span class="mi">255</span><span class="p">,</span> <span class="n">cv2</span><span class="p">.</span><span class="n">THRESH_BINARY</span><span class="p">)[</span><span class="mi">1</span><span class="p">]</span>

</code></pre></div></div>

<p>Now that we have a black and white version of the image, it’s time for some
libraries to do the processing. skelotonize from <code class="language-plaintext highlighter-rouge">skimage.morphology</code> makes
lines as thin as possible without breaking the path, but it expects the
inverted version of the black and white image so we invert it using
<code class="language-plaintext highlighter-rouge">skimage.util</code>. Next we analyze the skeleton using <code class="language-plaintext highlighter-rouge">skan</code>. This sometimes fails
within the library, so if that happens we just hope that it works for a
different threshold. <code class="language-plaintext highlighter-rouge">skan</code> generates path coordinates, but it will generate
many extra nodes. A straight line will end up with a node at every step along
the path. <code class="language-plaintext highlighter-rouge">rdp</code> fixes this by eliminating the redundant nodes in the path. It
even has a configurable epsilon fuzzy factor.</p>

<p>Many of these libraries actually were suggested by Gemini. The trick is that it
also suggested many idea which don’t work, so I had to visualize where each
suggestion was taking the image.</p>

<div class="language-python highlighter-rouge"><div class="highlight"><pre class="highlight"><code>
<span class="c1"># Invert black and white
</span><span class="n">bw_invert</span> <span class="o">=</span> <span class="n">invert</span><span class="p">(</span><span class="n">bw</span><span class="p">)</span>

<span class="c1"># Make sure very thin
</span><span class="n">skeleton</span> <span class="o">=</span> <span class="n">skeletonize</span><span class="p">(</span><span class="n">bw_invert</span><span class="p">)</span>

<span class="c1"># Analyze and simplify the skeleton.
</span><span class="k">try</span><span class="p">:</span>
    <span class="c1"># Calling "Skeleton" sometimes fails
</span>    <span class="n">skel</span> <span class="o">=</span> <span class="n">Skeleton</span><span class="p">(</span><span class="n">skeleton</span><span class="p">)</span>
    <span class="n">simplified_paths</span> <span class="o">=</span> <span class="p">[</span><span class="n">rdp</span><span class="p">(</span><span class="n">skel</span><span class="p">.</span><span class="n">path_coordinates</span><span class="p">(</span><span class="n">i</span><span class="p">),</span> <span class="n">epsilon</span><span class="o">=</span><span class="mf">0.5</span><span class="p">)</span> <span class="k">for</span> <span class="n">i</span> <span class="ow">in</span> <span class="nb">range</span><span class="p">(</span><span class="n">skel</span><span class="p">.</span><span class="n">n_paths</span><span class="p">)]</span>

    <span class="c1"># Write paths to svg.
</span>    <span class="n">write_skeleton_to_svg</span><span class="p">(</span><span class="n">simplified_paths</span><span class="p">,</span> <span class="n">width</span><span class="p">,</span> <span class="n">height</span><span class="p">,</span> <span class="n">output_path</span><span class="p">)</span>
<span class="k">except</span> <span class="nb">Exception</span> <span class="k">as</span> <span class="n">e</span><span class="p">:</span>
    <span class="k">print</span><span class="p">(</span><span class="sa">f</span><span class="s">'Failed to skeletonize </span><span class="si">{</span><span class="n">output_name</span><span class="si">}</span><span class="s">: </span><span class="si">{</span><span class="n">e</span><span class="si">}</span><span class="s">'</span><span class="p">)</span>

</code></pre></div></div>

<h3 id="step-7-manually-putting-it-together">Step 7: Manually putting it together</h3>

<p><img src="/assets/images/fairy.svg" alt="Fairy Final" /></p>

<p>There’s a few things the AI doesn’t yet do in this pipeline.</p>

<p>When paths intersect <code class="language-plaintext highlighter-rouge">skan</code> doesn’t know which ones should connect to each other,
so it leaves all of them disjoint. I used Inkscape’s node joining to do this.</p>

<p><code class="language-plaintext highlighter-rouge">rdp</code> can simplify straight lines, but it doesn’t simplify curves.
There’s some work in this area I found, but nothing easily callable from python
that I have found yet. And as I already have each file open in Inkscape at the
last step, I just use “Simplify Path”. Note, python can actually call Inkscape but
that’s only intersting if I solve automating the path joining.</p>

<h3 id="step-8-importing-the-images-into-the-app">Step 8: Importing the images into the app</h3>

<p>The last step is importing the svgs into the app.
I did the first couple manually, then asked Antigravity CLI to generate a python
script to import the rest. It’s not too intersting, the core of it looks like this:</p>

<div class="language-python highlighter-rouge"><div class="highlight"><pre class="highlight"><code>
  <span class="n">page_svelte_content</span> <span class="o">=</span> <span class="sa">f</span><span class="s">"""&lt;script lang="ts"&gt;
import DrawArea from '$lib/components/DrawArea.svelte';
import </span><span class="si">{</span><span class="n">pascal_name</span><span class="si">}</span><span class="s">Image from './</span><span class="si">{</span><span class="n">component_filename</span><span class="si">}</span><span class="s">';

const </span><span class="si">{</span><span class="n">paths_var_name</span><span class="si">}</span><span class="s"> = [
</span><span class="si">{</span><span class="n">paths_list_str</span><span class="si">}</span><span class="s">
];
&lt;/script&gt;

&lt;DrawArea
  paths={{</span><span class="si">{</span><span class="n">paths_var_name</span><span class="si">}</span><span class="s">}}
  Background={{</span><span class="si">{</span><span class="n">pascal_name</span><span class="si">}</span><span class="s">Image}}
  width=</span><span class="si">{</span><span class="n">w_str</span><span class="si">}</span><span class="s">
  height=</span><span class="si">{</span><span class="n">h_str</span><span class="si">}</span><span class="s"> /&gt;
"""</span>
  <span class="k">with</span> <span class="nb">open</span><span class="p">(</span><span class="n">os</span><span class="p">.</span><span class="n">path</span><span class="p">.</span><span class="n">join</span><span class="p">(</span><span class="n">dest_dir</span><span class="p">,</span> <span class="s">"+page.svelte"</span><span class="p">),</span> <span class="s">'w'</span><span class="p">,</span> <span class="n">encoding</span><span class="o">=</span><span class="s">'utf-8'</span><span class="p">)</span> <span class="k">as</span> <span class="n">page_f</span><span class="p">:</span>
    <span class="n">page_f</span><span class="p">.</span><span class="n">write</span><span class="p">(</span><span class="n">page_svelte_content</span><span class="p">)</span>

</code></pre></div></div>

<p>And with that I end up with a different page for each image to be traced. ex.
<code class="language-plaintext highlighter-rouge">myapp/trace/panda</code>. And it updates the JSON structure I’m using from the home
page for the image picker. I could have made it all data in a JSON file, but I
find it easier to just have one file per image.</p>

<h2 id="the-phone-app">The phone app</h2>

<h3 id="the-first-version">The first version</h3>

<p>The first version of the app was written by Gemini. I didn’t know how it worked.</p>

<p>And I really really did not like that.</p>

<p>When I had people test it I’d have to ask Gemini to make it easier or harder.
To make it less precise about how far the trace had to be to the line or the percent
of the line that had to be covered. It would make the tweaks but the app never
felt right.</p>

<h3 id="the-second-version">The second version</h3>

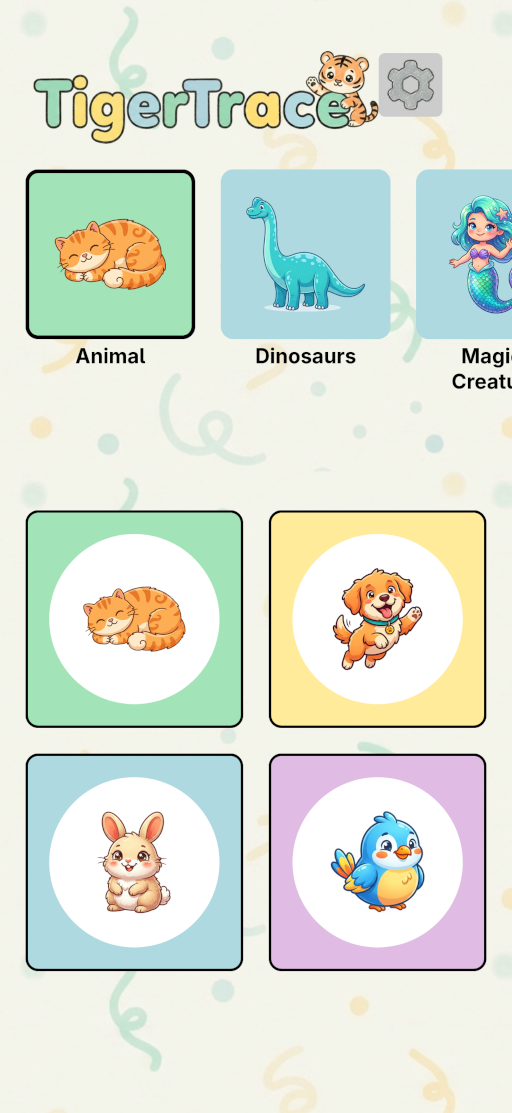
<p><img src="/assets/images/tiger-trace-home.png" alt="Tiger Trace Home" /></p>

<p>So I rewrote it myself.</p>

<p>There’s not much to say about the stack. It’s the one written <a href="https://khromov.se/how-i-published-a-gratitude-journaling-app-for-ios-and-android-using-sveltekit-and-capacitor/">about by someone
else in this
blog</a>.</p>

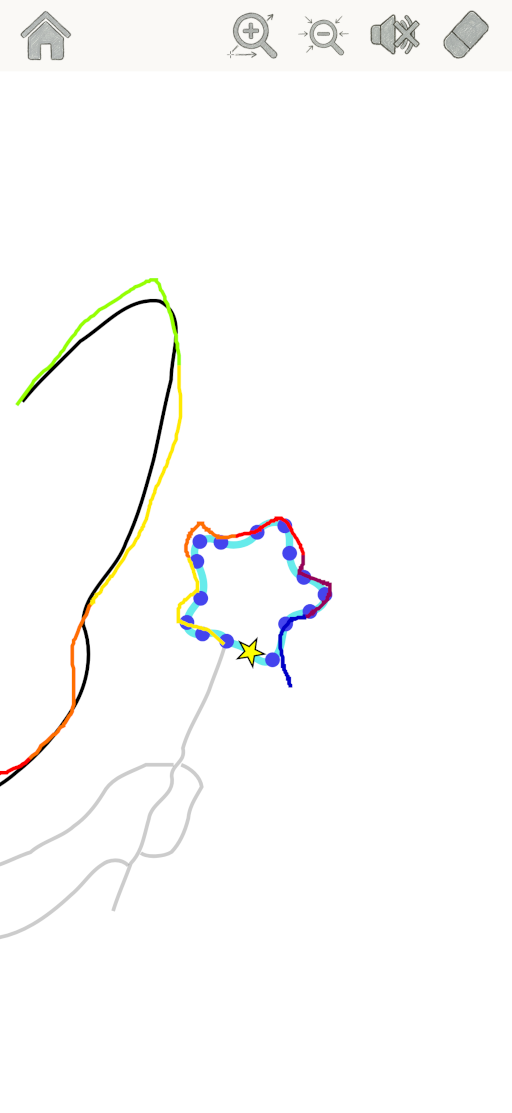
<p>There’s a Svelte website which is wrapped by Capacitor JS in a web view to
launch as an app. Drawing is just accomplished by adding a dynamic polyline to
the svg.</p>

<p>Then everything else is handled by libraries:</p>
<ul>
  <li>Svgs paths are parsed by <code class="language-plaintext highlighter-rouge">svg-path-parser</code>.</li>
  <li>Zoom animations are controlled by <code class="language-plaintext highlighter-rouge">gsap</code>.</li>
  <li>Colors are from <code class="language-plaintext highlighter-rouge">js-colormap</code>.</li>
</ul>

<p>I could have taken a more guided approach to getting an agent to build it, but
I was curious to learn Svelte anyway. I did get LLM help with a couple issues,
especially when it only reproduced on actual phone hardware.</p>

<p>But with a fairly simple setup with a few libraries, you can draw.</p>

<p><img src="/assets/images/tiger-trace-drawing.png" alt="Tiger Trace Drawing" /></p>

<h2 id="generating-images-all-the-paths-which-didnt-work">Generating images: All the paths which didn’t work</h2>

<p>An LLM could not do this by itself. That was my first attempt. Just ask an
agent to build this app. It didn’t work. But LLMs did allow exploring lots of
bad ideas faster.</p>

<h3 id="failure-1-have-the-coding-agent-do-everything">Failure 1: Have the coding agent do everything</h3>

<p>Asking Antigravity to build the app from scratch including generating all media
went better than I’d have expected. You could trace and it even make a somewhat
competent cat consisting of a circle for the head and two triangles for the
ears by manually writing an svg file.</p>

<p>But that was about as complicated as the images could get, and many of them
were quite broken. After exhausting my freebie Antigravity quota I tried Claude
with playwrite to try to fix the images. I told Claude it was fixing the work
of a different agent and it took the time to criticize Gemini’s work, before
making the images even worse.</p>

<p>Clearly asking coding agent’s to generate images is just the wrong task for the
job.</p>

<h3 id="failure-2-asking-the-ai-agents-to-write-an-import-pipeline">Failure 2: Asking the AI agents to write an import pipeline</h3>

<p>Ok so Nanobana can generate the images but how can I make these into svgs.</p>

<p>Inkscape has a “Trace bitmap” feature which even supports centerline tracing.
It’s not bad but everything is put into one line. There’s “break paths” but it
does not break into anything resembling natural tracing. Many things remain
connected to the wrong thing.</p>

<p>I tried going down this path where I’d ask Nanobana to make each line with a
unique color. The idea was I could mask the image to look at one line at a
time. This only kind of works. There’s actually lots of noise in AI generated
images and even if it’s not visible to us it really messes up attempts at color
masking. Nanobana is also not very good at making strictly unique colored
lines. It reuses colors, and it ends up blending colors when lines come close
to each other. The noise from this set of images just foiled any attempts at
post-processing. I’m still convinced this path could work if I spent more time
and actually had a classifier try to group pixels based on the noisy lines
coming from Nanobana, but it was going to take more time to do this than the
rest of the project.</p>

<p>When I asked an AI agent to write a python script for importing the images it
made something which just output images which were clearly broken. No amount of
feeding the broken images into the agent and asking it to fix things was going
to get anywhere.</p>

<h3 id="failure-3-direct-text-to-svg">Failure 3: Direct text to SVG</h3>

<p>What if Nanobana is introducing too much complexity?</p>

<p>Gemini convinced me to try getting <a href="https://github.com/BachiLi/diffvg">diffvg</a>
working to directly generate vector graphics. And while the project looks cool,
getting it working on RunPod was taking too long as I was teaching myself
Docker just to get it to work. Considering it’s a 6 year old project, and AI
has moved a lot in the past few years, I decided it probably wasn’t work
persuing.</p>

<p>Could be wrong though, I just never got it working.</p>

<h3 id="what-got-me-out-of-the-failure-cycle">What got me out of the failure cycle</h3>

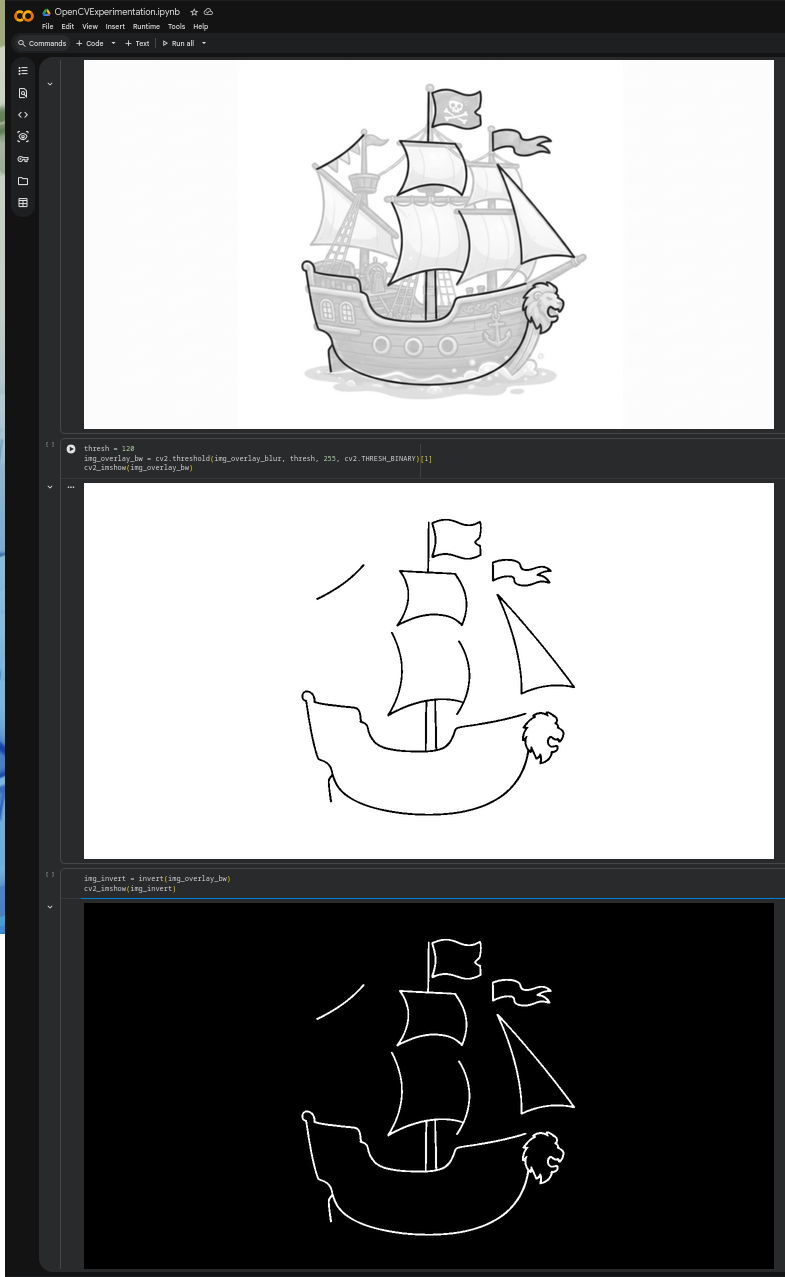
<p>Ultimately what got me out of the cycle of failure was putting down the
agents and visualizing things one step at a time.</p>

<p>I opened up colab and visualized how I was transforming an image step-by-step
as I ran it through various OpenCV, skeletonize, and other libraries.</p>

<p><img src="/assets/images/pirate-colab.png" alt="Pirate Ship" /></p>

<h2 id="conclusion">Conclusion</h2>

<p>All of this struggle was probably a pretty average experience with AI.</p>

<p>LLMs can do some very well things. It’s honestly surprising how well it picks out the “important”
lines with no further direction.</p>

<p>Other times it was fairly frustrating. I didn’t expect to need to provide so
much manual work on building a pipeline for creating the tracing guides.</p>

<p>How people view the output of this project will depend on their view of AI. Is
it AI slop? The images are clearly the work of AI image gen. The code had some
AI influence. Or it’s the promise of a dad being able to generate an app for
their kid given a very limited amount of free time.</p>

<p>If you have an Android phone you’ll be able to download TigerTrace when it
launches soon. Maybe iPhone later if I decide it’s worth paying $99/year to
give something away for free on that app store too.</p>

<p>Or generate your own app. That is the promise of AI after all.</p>]]></content><author><name></name></author><category term="ai" /><summary type="html"><![CDATA[My daughter just turned three years old so she’s allowed some screen time. This could also be an opportunity to practice her fine motor skills. The first couple apps I checked out felt like a ripoff though. They were trying to get me into an annual subscription just for tracing some pictures.]]></summary></entry></feed>